Manual
Part A.1 Builing/Viewing a "basic" soma
A.1.a. Conventions
Conventions used in these documents:
Text to be added as part of a hoc program (to be explained later) is highlighted in type face.
Code used in programming but that does not need to be added to the program you are currently working on will be in green.
Code that is to be removed from a previous version will be in a bold green
Code that is colored and italicized indicates that it should be typed at the command prompt. (oc>type this). After typing the code you will need to press the Enter/Return key.
The dark blue type face in part D of the tutorial indicates the NMODL language.
Note: NEURON is case-sensitive
Note: Some printers may not print the blue highlights. If you want to print them, select "print background colors." In Windows, that option is found in the page setup dialog box.
A.1.b. Creating a soma
In a cell's soma (and dendrites), are represented by what are called sections. Sections in are cylindrical in nature and, for computational reasons, can be divided in to smaller areas called segments..
From experimental measurements, we know that our soma is approximately spherical with a diameter of 18.8µm. Before we set the soma's properties, we must first create a file to hold all of the pieces that go into creating a new neuron. We suggest that you open your favorite text editor (notepad on a Windows machine, textedit or BBEdit on a Mac) and save a blank file called Soma.hoc. Keep the file open because you will type the commands highlighted in blue into it as you go along. To make it easy to distinguish from other sections we will call this section "soma". The synatax for creating this section is as follows:
create soma
Having seen that this is highlighted, you have hopefully typed it in your text file called Soma.hoc. After typing it in, save the file.
This command creates a new section with default properties
- number of segments in the section (soma.nseg = 1)
- diameter (soma.diam = 500 µm)
- length (soma.L =100 µm)
- specific membrane capacitance [1 µF/cm2]
- cytoplasmic resistivity (Ra = 35.4 ohm-cm)
access soma
The access statement tells that when we aren't specifying a particular section (i.e. we're not using method 1 or 2), all subsequent references to properties of a section belong to the default section, in this case the soma. For example
A.1.c. Changing the default parameters
For our simulation, we need to change some of our soma's properties; the diameter of the section (diam), the length of the section (L), and the axial resistance (Ra), which in the rat subthalamic nucleus has a high value of 123 ohm-cm. All of these values are taken from data specific to subthalamic projection s.
When we tell to change parameters we need to be sure it knows to which section those parameters belong. While this isn't terribly relevant when we only have one section, our cell will eventually have many different sections. Therefore we may as well address this issue immediately. There are four ways to do this:
-
Use the dot notation. Here, we refer to the section properties with the section name followed by a "dot" or period (".") followed by the property name. To assign values to section parameters such we can use:
soma.nseg = 1
soma.diam = 18.8
soma.L = 18.8
soma.Ra = 123.0 - Place the name of the section on
the same line and immediately in front of a statement that
refers to a section property:
soma nseg = 1
soma diam = 18.8
soma L = 18.8
soma Ra = 123.0 - Group multiple properties within braces:
soma { nseg = 1 diam = 18.8 L = 18.8 Ra = 123.0 }
The statements within this pair of braces pertain to soma.
C programmers should note that the brace { cannot be on its own line!
- Since we've already set the default segment using the access statement we could simply list the parameters:
nseg = 1
diam = 18.8
L = 18.8
Ra = 123.0 would change the default section, in this case the soma.
To print the value of any section parameter we can use the print command
with the dot notation, for example:
print soma.diam
Thus, the program so far is:
create soma
access soma
soma nseg = 1
soma
diam = 18.8
soma
L = 18.8
soma
Ra = 123.0
One point to notice about the program is that the access statement is immediately after the create statement. When writing hoc code it's a good practice to group all the create statements together, and put the access statement immediately after the last create statement. This makes sure that there's only one access statement in the program.
A.1.d. Inserting membrane channels (mechanisms) throughout the segment
Each section created in this fashion has the default properties (see above) automatically inserted, but other mechanisms (e.g., channels) with their own properties must be explicitly inserted into a section. includes two built-in channel membrane mechanisms: Hodgkin-Huxley channels (hh) and passive channels (pas). Each of these mechanisms can be inserted using the insert command. You can insert a new mechanism with the following code:
soma insert hh
soma insert pas
Note that since the soma is the default section, as defined by the access command, typing soma before insert is redundant and unnecessary. However, assuming that we don't know what section/segment is the default section/segment, we can be sure the mechanisms are placed properly by explicitily naming the section before inserting the mechanisms.
You can add as many mechanisms into each section as you need for your model. The more mechanisms in a particular section, the longer it takes to compute the changes in the simulation.
When you add a new membrane mechanism to a section, you add the new membrane mechanism's properties and their default values to the section. For example, if you add passive channels to the section, you will introduce two new properties to the section:
- g_pas (specific membrane conductance [S/cm2]) and
- e_pas (reversal potential [mV]).
For our simulation, neither the default Hodgkin-Huxley channels nor the passive properties will accurately model our type. However, for the moment we will leave the default properties to explore a working system. In a latter section we will show you how to change these default properties and even how to create your own mechanims.
The Hodgkin-Huxley channels add the following new properties to the section:
- gnabar_hh: The maximum specific sodium channel conductance [Default value = 0.120 S/cm2]
- gkbar_hh: The maximum specific potassium channel conductance [Default value = 0.036 S/cm2]
- gl_hh: The maximum specific leakage conductance [Default value = 0.0003 S/cm2]
- ena: The reversal potential for the sodium channel [Default value = 50 mV]
- ek: The reversal potential for the potassium channel [Default value = -77 mV]
- el_hh: The reversal potential for the leakage channel [Default value = -54.3 mV]
It also adds the following state variables, that can be displayed with the print command:
- m_hh: The sodium activation state variable
- h_hh: The sodium inactivation state variable
- n_hh: The potassium activation state variable
- ina: The sodium current
- ik: The potassium current
Thus, so far the text file, Soma.hoc, should have the following lines in it:
Be sure to save the file as Soma.hoc!create soma
access somasoma nseg = 1
soma diam = 18.8
soma L = 18.8
soma Ra = 123.0soma insert pas
soma insert hh
A.1.e. Adding an electrode (point process)
makes the distinction between mechanisms that are attributed to an entire section (e.g., HH channels) and mechanisms that are associated with a particular point in the section (e.g., voltage clamp electrode or synapse). While the former are most conveniently expressed in terms of per unit area, the point processes are more conveniently expressed in absolute terms (e.g., current injection is usually expressed in terms of nA instead of nA/cm2). Point processes also differ in that you can insert several in the same segment.
In , point processes are handled as objects which means that to create one you need to first create an object variable to be associated with the object and then create a new object. To declare object variables, you enter the following:
objectvar electrode
This creates an object variable named electrode. Now you need to create the actual object. Newly created objects need to be associated with a particular section, so we need either to have a default section or to specify the section name with which the object is to be associated. The optional section name is given first followed by the assignment of the object variable to a new instance of a particular object (in this case a current clamp) with the location of the object in the section given in parentheses. The location is specified with a number between 0 and 1 (inclusive) where the number represents the fractional length along the section to place the point process. For example, adding soma electrode = new IClamp(0.5) to the code will place a point process i.e. electrode half way between the 0 and 1 end of the "soma" segment
Since the default section in our program is soma, electrode = new IClamp(0.5) will accomplish the same result.
As with channels, each point process has its own set of properties. Below is a list of IClamp point processes properties.
IClamp:
- del: The delay until the onset of the stimulus (in ms)
- dur: The duration of the stimulus (in ms)
- amp: The amplitude of the stimulus (in nA)
There are several built-in point processes, including: IClamp, VClamp and ExpSyn. Additional point processes can be built into the simulator with the model description language.
A.1.f. Set properties of electrode
In our model, we want to stimulate the soma by giving it a current pulse. We can accomplish this by adding setting the properties of the IClamp we just added. To set the properties of point processes we must use the dot notation:
soma electrode.del = 100
soma electrode.dur = 100
soma electrode.amp = 0.45
This creates an current clamp electrode in the centre of the soma. This electrode will start injecting a 0.4nA current pulse 100ms after the start of the simulation. The for a duration of pulse will be 100ms after which it will turn off. .
So, with the IClamp now in place our program looks like this :
create soma
access soma
soma nseg = 1
soma diam = 18.8
soma L = 18.8
soma Ra = 123.0
soma insert hh
soma insert pas
objectvar electrode
electrode = new IClamp(0.5)
electrode.del = 100
electrode.dur = 100
electrode.amp = 0.45
Be sure to save the Soma.hoc file!
Note: just as when we were describing the four different ways to define the soma, our new electrode can be referred to in many ways. Soma electrode.del is one way of describing the delay property of the electrode; electrode.del (once we've accessed the soma) is another.
A.1.g. Running the simulation
Before running the simulation it needs to be told how long to run. As the default, simulations run for 5 ms of simulated time, but this can be changed by setting the tstop variable to another value (in ms). For example, to run a simulation for 300ms, enter:
tstop = 300
This will set the simulation stop time to 300ms and run the simulation from the beginning.
So that we will have something to look at after we run the simulation, add the following line to the end of your code:
print soma.v
This line tells the program to display the membrane potential of the soma after running the simulation for 300 msec.
Your Soma.hoc file should now have the following lines in it.
create soma
access soma
soma nseg = 1
soma diam = 18.8
soma L = 18.8
soma Ra = 123.0
soma insert hh
soma insert pas
objectvar electrode
electrode = new IClamp(0.5)
electrode.del = 100
electrode.dur = 100
electrode.amp = 0.45
tstop = 300
print soma.v
You will notice that the sample code has many more lines. this is due to the fact that the code is annotated. lines starting with // are not processed. therefore the // can be used to make comments to your code.
Now, for the first time, you will run your program. To do so, open the folder you saved (Soma.hoc) into. Double click on the file, which should have a blue icon. If it doesn't, then the install went bad and you'll need to tell Windows to run .hoc files using the (>bin>.exe) program. After running the program you should see the following terminal window:
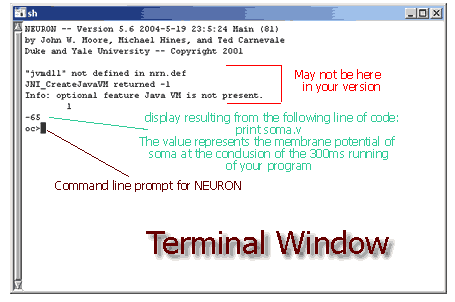
If your program isn't working, take a look at the file called Soma.hoc found in the "code" folder in the nrntuthtml folder and make the appropriate changes.
A.1.h. Adding the display of all variables to your program.
To display properties and the current values of the sections in your model, you can call the psection function. To see the properties of a specific section:
- psection() - to list the properties of the default section defined by the access command
- soma psection() - to list the properties of a particular section in the model:
- forall psection() - to list the properties of all sections in the model:
Add the forall psection() statement on the line after print soma.v
To run the program again, type run() after the oc> prompt and then hit return.
While you can now see what has been inserted, where it has been inserted and the values for the various variables, this isn't really that exciting because nothing seems to happen. In the next section you will be able to change parameters and rerun the program while viewing any changes caused by the modifications you may have made. Be patient!
SUMMARY:
- Created a basic cell soma using a text file to feed command line items to the program
- Changed default parameters for the shape (nseg, diam) and membrane parameters (L, Ra)
- Inserted membrane channels (Na, K)
- Added an electrode (point process - IClamp)
- Set the properties of our electrode
- Ran our program!
- Viewed properties
Acknowledgements
Last modified on 10/29/04 by
Albert Borroni, CS/Neuoriscience Oberlin College (aborroni@oberlin.edu)
based on tutorial written by
Andrew Gillies (andrew@anc.ed.ac.uk)
David Sterratt (dcs@anc.ed.ac.uk)
which is originally based on the tutorials by Kevin E. Martin
with the assistance of Ted Carnevale and Michael Hines