Manual
B2_Creating Realistic Morphology
We will now dramatically enhance our neuron by introducing a more complete dendritic tree morphology that will be read from two files (one for each of the two trees).
As in previous tutorial, type the code below that is highlighted into the file. Delete the code that is bold. Remember to save it periodically. Save it in the same folder as Soma.hoc, Thalamic1.hoc & Thalamic2.hoc etc.
Open a new blank text file. The code in your new text file, Thalamic3.hoc will be build off of the code from Thalamic2.hoc and therefore should look like the code below. You may open Thalamic2.hoc and "save as" Thalamic3.hoc or copy and paste the code below into a new blank text file.
load_file("nrngui.hoc")
ndend = 2
create soma, dend[ndend]
access soma//Define membrane mechanisms
soma nseg=1
soma diam=18.8
soma L = 18.8
soma Ra=123.0insert hh
gnabar_hh= 0.2
gl_hh = .0001666
el_hh = -60.0
insert pasdend[0] { nseg = 5 diam = 3.18 L = 701.9 Ra = 123}
dend[1] { nseg = 5 diam = 2.0 L = 549.1 Ra = 123 }
for i = 0, ndend-1 dend[i] { insert pas g_pas = .0001667 e_pas = -60.0 }// Connect things together
connect dend[0](0), soma(0)
connect dend[1](0), soma(1)// create an electrode in the soma
objectvar stim
stim = new IClamp(0.5)
stim.del = 100
stim.dur = 100
stim.amp = 0.45print soma.v
forall psection()
tstop = 300
The system for adding the realistic morphology is similar to that used in
creating the we've created so far,
except now, rather than two dendrites (each being 1 section, 5 segments) we
have two dendritic trees, containing 23 (defined in treeA.dat) and 11 (defined
in treeB.dat) sections respectively (these values are defined from the full
tree morphology illustrated in part A.3.1).
Before starting anything be aware that the treeA and treeB.dat files must be in the same directory/folder as the file that calls them, in this case Thalamic3.hoc. Therefore you will need to download and save them to the appropriate directory. This can be done by right clicking (cntl-click for Mac users) on the name and selecting the appropriate option (save link as).
The code in our current file Thalamic3.hoc, which was created in the previous tutorial, begins in a very similar manner to the one we need to create. In the new version, Thalamic3.hoc, references to dendrites (e.g. dend[0], dend[1]) must be replaced with references to the files containing the tree information (treeA and treeB). We will also need to declare a new variable (f). This will be explained later. Thus the first few lines should look like this (blue background indicates where changes need to be made):
ndend = 2
create soma,dend[ndend] treeA[1], treeB[1]
access soma
objectvar f

  create soma
  soma nseg = 1
....
Don't forget to delete "ndend = 2" and "dend[ndend]," as they are in bold text.
We have created a new objectvar f used to reference the files.
Note, we have not yet created our demdrotes. Unlike the previous example, we no longer know the number of dendrites in the trees as this is now specified in the tree files (line 1).
However, notice that we have already created tree section arrays of length 1.
This is done because dynamically interprets the commands, each section and object variable must be declared before they are used. This means that in order for to know how to interpret commands about a section, it must be declared before the code that accesses it is interpreted by .
In general, the two rules we need to follow are:
- If a section or object is referenced inside a procedure, create or declare it before the procedure in which it is used.
- When creating or declaring an array of sections or objects that will be recreated or redeclared inside a procedure, create or declare an array of length 1 before the procedure in which the sections or objects are recreated or redeclared.
To access a file, we need to create a new file object. This is done in a similar manner to creating other objects (for example the IClamp in part A). The code in Thalamic3.hoc should be amended as follows:
insert pas
dend[0] { nseg = 5 diam
= 3.18 L = 701.9 Ra = 123}
dend[1] { nseg = 5 diam = 2.0 L = 549.1 Ra = 123 }
for i = 0, ndend-1 dend[i] { insert pas g_pas = .0001667 e_pas = -60.0
}
note the previous 3 lines are in bold and therefore need to be removed. they are the old instructions which defined the two 5 segement dendritic sections. these will be replaced by our 2 trees! The code below will allow for the creation and attachement of the two trees.
f = new File()
This line above creates a file object called f. This file object will be used to hold the data from TreeA.dat and subsequently TreeB.dat. Remember that these files contain the information about the different dendritic branches.
The treeA.dat and treeB.dat can have virtually any format, as how the information is read is specified in our program.Format for TreeA.dat and TreeB.dat files:
The first line in this file indicates the number of sections in the tree. In the case of TreeA.dat, we have 23 sections or branches. Each following
line has the following format: where
|
Next we will need to open the appropriate file and start reading the data
that it contains. This is done with the ropen() function. This function is
used in conjunction with the New file we've created which happens to be
called f. The code for opeing treeA.dat should be inserted after
the f = new File() code which was just added to
the file. The syntax is as follows:
f.ropen("treeA.dat")
We will now need to set up an array which will hold all the information for each tree. Before we create the array we need to know how many sections there are in a particular tree. This is defined in the TreeA.dat file on the first line (see above box). In the case of TreeA.dat the array will have 23 elements. Therefore we need to read in the value on line 1 and then create the array.
To read a single value from the file we will use the function scanvar(). Each time scanvar() is used, the next variable will be read from the file. Thus the first time we use scanvar() the first value on line one of the file will be read in. In this case that value will be assigned to a variable called ndendA. The code for accessing the # of sections and creating the array would be as follows:
f.ropen("treeA.dat")
ndendA = f.scanvar()
create treeA[ndendA]
Now we can continue to use f.scanvar() to read the rest of our file. For example, the next line of our file treeA.dat was:
1 2 3 3.180 10.000 0.000 0.000 0.000 18.092 -0.346 4.932
Thus the second call to f.scanvar() returns the value 1, the third use of f.scanvar() returns the value 2, the fourth returns 3 and the fifth returns 3.180 etc.
Two other commands used in the following code are pt3dclear() and pt3dadd(). pt3dclear()will erase any 3-D positioning information associated with the section. pt3dadd() takes four arguments (X, Y, Z, and diam) and will add a new coordinate to the section. Usually there are coordinates for each end of the section which can be set by making two calls to pt3dadd()--the first for the "0" end of the section and the second for the "1" end of the section.
Defining tree A
Thus we can define our dendritic tree treeA using the code below. Remember that array indices start with 0 rather then 1. For this reason the code generally has a -1 after most variables.
    for i = 0,ndendA-1 {

      me = f.scanvar() - 1 // sets the current branch/section
      child1 = f.scanvar() - 1 //defines the ID of 1 section that branches off the current section
      child2 = f.scanvar() - 1


      treeA[me]{ //sets the element in the treeA array to the current branch/section

       	//the following 4 lines defies the relevant properies of the current section/branch
      	nseg = 1
    		diam = f.scanvar()
      	L = f.scanvar()
      	Ra = 123


      	// the pt3dclear() function clears any 3D info from previous iteration.
      	pt3dclear()


			//initialise 3D information for each end of this particular section
			// pt3dadd(X, Y, Z, diameter of section)

      	pt3dadd(f.scanvar(),f.scanvar(),f.scanvar(),diam)
      	pt3dadd(f.scanvar(),f.scanvar(),f.scanvar(),diam)

			//Insert pas properties into the section
			insert pas
			//Change values for leak and Vm
      	g_pas = .0001666
      	e_pas = -60.0

      	//Connect child sections to main branch treeA[me]
			if (child1 >= 0) {
          	connect treeA[child1](0), 1
    		}

    		if (child2 >= 0) {
          	connect treeA[child2](0), 1
        	}
        }
    }
f.close() //closes the file data holder called f
The above loop creates each section/branch of the tree as defined by the file. The local variable me is the first value read from the file, and is the reference for the branch from which the other 2 branches connect. As we know, arrays start at 0, however, our file references start at 1, so the variable me is defined as f.scanvar() - 1. Similarly the references for child1 and child2 branches have 1 subtracted. The branch diameter (diam) and length (L) are directly read from the file. Finally all the 3D position information is read from the file and the branch sections are connected up to form the tree.
The loop repeats this setup for each branch/section (note the number of tree sections for each tree is passed as the two parameters to the template).
Creating the second tree
The second tree (treeB) is done in a very similar manner. Starting with the line f.ropen("treeA.data") copy the code for treeA and replace all instances of treeA with treeB. You will also need to change references to ndendA to ndendB.
Connecting the two trees to the soma
To complete
our template, after both trees have been read in from the files, we must
connect the trees to the soma. Replace
// Connect things together
connect dend[0](0), soma(0)
connect dend[1](0), soma(1)
with
// Connect things to the soma
connect treeA[0](0), soma(1)
connect treeB[0](0), soma(0)
Viewing the results of your labor
At this point it might be a good idea to run the program you've just created.
 B.2
b Showing and rotating the
B.2
b Showing and rotating the
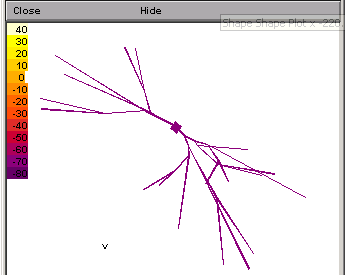
If you open a shape plot (Graphs>>Shape) and run the program again, you should see the a graph.
To see the color version, as displayed to the left, you will need to right-click on the image and select "Shape Plot" from the menu. Otherwise, it will simply be in black and white. Also, after changing to a shape plot, adjust the thickness of the branches by right-clicking and selecting "Show Diam:" from the Shape Style option.
The final , with a full dendritic tree morphology is shown here in a shape plot. This form of shape plot shows the voltage of the sections as a hot scale (hot colours mean high voltage, cool colours low voltage as indicated in the scale). By opening the run control window (Tools>>Run Control) and adjusting the Int (mV) value, you can change the color of the cell.
In three demensions it is sometimes difficult to see the real extent of the dendritic arborization. In this case it helps to rotate the image. To do so right-click on the image and select "3D Rotate" Then use the left button to rotate and the combiniation of cntl-left click to move the image.
To compare your code to a sample code, click here.
B.2.c
Note, in this example, each branch/section only has one segment, independent of how long the branch may be. You may want to increase the number of segments for a higher spatial resolution (see part A.3).
Summary
- Revised the previous code to allow for reading in of morphological data.
- Showing the s in a shape plot (rotating group)
Next: Creating Multiple s
Acknowledgements
Last modified on 10/29/04 by
Albert Borroni, CS/Neuoriscience Oberlin College (aborroni@oberlin.edu)
based on tutorial written by
Andrew Gillies (andrew@anc.ed.ac.uk)
David Sterratt (dcs@anc.ed.ac.uk)
which is originally based on the tutorials by Kevin E. Martin
with the assistance of Ted Carnevale and Michael Hines