Manual
C.1 Creating multiple s
C.1.a Defining a template to create many "typical s"
In " B.2.Creating realistic morphology" we created a single subthalamic . However, the subthalamic nucleus is really made up of a network of interconnected s. Therefore, in our goal to create a realistic model of the subthalamic nucleus we will create 4 more s through the creation of a template. The template method will allow us in the future to create as many s by simply changing 1 line of code. In the subsequent tutorial we will link those 4 s together.
As in previous tutorial we will use our previous code, Thalamic3.hoc, as a bases for the new and improved version. Therefore you should copy the Thalamic3.txt code into another file. Call this new file SubThalNucl1.hoc. Alternatively, you could open Thalamic3.txt in a text editor and use the save as feature to save it as SubThalNucl1.txt. You can find a copy of Thalamic3.hoc in the files directory of this site. Also, remember that to run the file you will need to change the extension from .txt to .hoc.
A template is an object definition--it defines a prototype of an object from which we can create multiple copies. After defining the template, an object variable must be declared.. Then, we can create a new instance of the object from the template that is an exact copy of the template. After we create the new object instance with all the info from the template, we can either use it as it is or we can modify it to fit our needs. In the following tutorial we will be creating a template and an object (actually 4 objects) that will be defined by the instructions in the template.
Creating the template
The structure of a template is as follows:
begintemplate name
code
endtemplate name
where name is the name of the template we want to create, and code is any program commands that we want the template to include.
Here is code that will transform Thalamic3.hoc code into a code that takes advantage of a template (again bold-green text is deleted; highlighted text is added:
load_file("nrngui.hoc")
//******START TEMPLATE **************
begintemplate SThcell
public soma, treeA, treeB
create soma, treeA[1], treeB[1]
access soma
objectvar f
The public statement is used to tell what parts of the template can be accessed outside of the template definition. Normally, if there are no public names, then the code inside the template is completely private and nothing, aside from the name of the template itself, is accessible from the rest of the program code. For example, if we create a template and we want to be able to put a current clamp in the soma of the we create, we would need to give access to the soma section via the public command.
proc init() { local i, me, child1, child2
The init() procedure. Most templates will have a special procedure called init() which is automatically called when a new object is created from the template. This is very useful for initialising the newly created object. In our init() procedure, above, we have created and defined all the sections in our and appropriately connected them together. Thus when a object is created from the template with the new command an entire subthalamic is built.
Arguments can be passed to init() (passing arguments to procedures is described in part A3 ) which can be used to affect the initialisation of the object via the parameters you pass to the new command. As an example of passing arguments to init() procedures, suppose we wanted to assess the differences in s with varying numbers of segments in their dendrites (nseg). We could do this in a single population of s creating multiple copies of s with different nseg values. If we write our init() procedure with an argument for nseg
proc init() { nsegdend = $1 ndend = 2 create soma, dend[ndend] ... dend[0] { nseg = nsegdend diam = 3.18 ... dend[1] { nseg = nsegdend ... }
Consequently, to create a (say 0) with dendritic sections containing, for example, 13 segments, we could create the using:
SThcells[0] = new SThcell(13)
Or to create all of our four cells with 3, 6, 9, and 12 dendritic segments respectively we could use the code
for i = 0, nSThcells-1 { SThcells[i] = new SThcell(3*(i+1)) }
access soma
....
// Connect trees to somas
connect treeA[0](0), soma(1)
connect treeB[0](0), soma(0)
}
endtemplate SThcell
| begintemplate SThcell //this will allow the various variables to be accessible outside of the template public soma, treeA, treeB //create a soma, treeA, treeB variable holders //creates and object variable called f which will hold the file proc init() { local i, me, child1, child2 access soma //set parameters for soma section //add predefined channel parameters called insert pas f = new File() //******Defining treeA ******* for i = 0,ndendA-1 { treeA[me] { // initialise and clear the 3D information if (child2 >= 0) { //******Defining treeB ******* for i = 0,ndendB-1 { treeB[me] { // initialise and clear the 3D information if (child2 >= 0) { // Connect things together # in parenthesis refer to segment } |
C.1.b Defining the s to be created from the template
Creating new s from this template is straightforward. If we define an array of object variables:
/ Connect trees to somas
connect treeA[0](0), soma(1)
connect treeB[0](0), soma(0)
}
endtemplate SThcell
//tells program to create 4 SThcells
nSThcells=4
//creates object variables called STHcells[] to hold information about each
of 4 cells
objectvar SThcells[nSThcells]
we can then create all four of our cells using the new command in a for loop:
for i = 0, nSThcells-1 {
SThcells[i] = new SThcell()
}
Using this loop 4 cells have been created(nSThcells). They are identified as
- SThcells[0]
- SThcells[1]
- SThcells[2]
- SThcells[3]
Remember that the indexing in arrays begins with 0 and therefore the for loop begins with 0 and ends with 1 minus the number of s we hope to create.
Each cell is a complete subthalamic as we had described at the end of B2. Creating realistic morphology.
C.1.c Setting the point process in all the cells
So far we've defined the cell membrane processes but, according to the code from SubThalNucl.hoc, only 1 cell is being activated. Furthermore, in our new network it is unclear which cell, if any will be activated. Looking at the code it is clear that the "soma" section will be activated but in our current version, there is no "soma" section. The references to the somas of the various cells are done called by SThcells[0-4].soma. Therefore, the code for adding a point process (ICLamp()) must be changed/modified/added. In this case we will delete the old code as shown below
objectvar electrodesoma electrode = new IClamp(0.5)
soma electrode.del=100
soma electrode.dur=100
soma electrode.amp = 0.45
Then we will replace it with the following for loop:
objectvar electrode[nSThcells]
  for i = 0, nSThcells-1 SThcells[i].soma {
electrode[i] = new IClamp(0.5)
electrode[i].del = 100
electrode[i].dur = 100
electrode[i].amp = 0.45
}
Finally, we need to remember to set a default section so that graphing works:
access SThcells[0].soma
print v
forall psection()
tstop=300
Save and run program
Now it is time to save and run the SubThalNuc1.hoc. This file should provide, with some opening of Graphs and rotating of images, the following graphs:
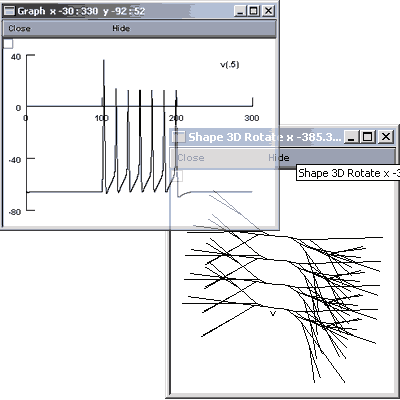
In order to see what is illustrated you will need to open the Graph>>Shape Plot and the Graph>> Voltage Axis.
Within the Shape plot you will need to right-click, select 3D Rotate and use the left button to rotate the display. If you don't rotate it, all s will be in the same plane and it will look as if there is only 1 .
Summary:
- Defining a template to create many "typical" s
- Defining the s created from the template
- Setting the point process in all the cells
- Positioning those s in a shape plot.
Next: Connecting the s together
Acknowledgements
Last modified on 10/29/04 by
Albert Borroni, CS/Neuoriscience Oberlin College (aborroni@oberlin.edu)
based on tutorial written by
Andrew Gillies (andrew@anc.ed.ac.uk)
David Sterratt (dcs@anc.ed.ac.uk)
which is originally based on the tutorials by Kevin E. Martin
with the assistance of Ted Carnevale and Michael Hines